Some may see no point in learning how to forward your text messages and call details to your Email. I mean, why would you want to if you have your phone with you anyway, right? There are few good reasons why you would do such a thing.
For example, you might want to forward those details because you’re going to be in a place where smartphones aren’t allowed, but you do have Internet access. Or, you might be traveling around the world, and you want to leave your phone at home so that you won’t lose it. Or, you could just need to have a backup of that information for whatever reason.
Since you still want to know who called you or who sent you a text message, you’ll want those forwarded to your Email. You’re bound to run into a business where you can gain access to a computer and check your Email. The good news is that there are various tools you can use to have your call or text information forwarded. Let’s take a look at a few.
Also Read: 7 Best Call Blocker Apps to Block Calls and Text Messages on Android
Contents
Missed Call & SMS to Email
An app that promises to forward your text messages and call details to your Email is Missed Call & SMS to Email. It’s not the most popular app on Google Play, but hey, an app has to start somewhere, right?
After you install the app, you will see a message with the terms of service. It’s up to you if you only accept or read everything. Tap on Accept and after it’s going to ask you for your Email details. Makes sense that it asks you for this information since it needs to know where to send your info. You will need to enter your Email and your password.

Once you’ve set everything up, it’s time to set the app up. You’ll need to enter information such as what you want to receive. You can either have just your missed calls forwarded or your messages. Choose both if you want!
After that enter the Email where you want to get the notifications. You can add two separate Emails, or you can insert the same one twice. Scroll down a bit, and now it’s time to decide when you want to receive that information. You can choose the schedule, and what days of the week you’ll get notified.
It is a great option if you have to forward missed calls from your personal phone to your work phone. Since it is your work phone we’re talking about, you probably want to get the notifications at a time when your boss is not around. I don’t think he/she would be too happy with that, but they don’t have to know. Shhhh.
Don’t forget to double check that you entered everything correctly. Once you’re sure everything is OK, tap Save Changes. Now, that wasn’t so hard now was it? Of course not!
Also Read: Top 10 Cheapest SMS Text Message Marketing Solution for Small Business
Missed Call Mailer
If the only thing that you want to forward are your missed calls, then this is the app for you. Missed Call Mailer will make sure that you get your missed calls, so you know who called you. This app is very easy to use, and it doesn’t ask you to give your Email password like other apps do. So, if you’re paranoid about your privacy (and who isn’t, right? ), this is an app I think you’re going to like.
When you launch the app after installing it, you’re going to see a black screen with very little options. It has a very user-friendly app that even someone who isn’t very tech-savvy can use without having to bug tech their geek friend to help them out.
At the top, you’ll see where you can type the Email you want the notifications of the missed calls to go to. Double check that you correctly entered the Email, since I don’t think you want the notification going to someone else right? Once you’re sure the information is correct, tap on Save Email.
After that, you’re going to get a message saying to answer an activation Email. Once you’ve followed the instructions in the Email, you’re all set.
Also Read: How to Optimize Windows 10 for Not Eating Data When You Are on a Limited Data Plan?
How to Auto Forward Text Messages on iOS 7 and Up?
Auto-Forwarding your text messages is also something that iOS users also want to do. There’s no obvious button to forward your text messages on your iPhone. The option that allows you to do it is not in plain sight, and you have to do quite a bit of tapping here and there to find it.
Step 1:
Tap on Messages.
Step 2:
Go to the text conversation that you want to forward.
Step 3:
Look for the individual messages you want to forward. Long-press on the speech balloon with the message in it.
Step 4:
You should see a pop-up menu at the bottom offering you the Copy and More options. If you’re using iOS 10, the other options should be above the speech balloon, but you can ignore them. Select More.

Step 5:
Now, you’re going to see an empty circle beside each message. After you select the messages you want to forward; they should have a blue checkmark next to it. If you want, you can also tap on other circles as well to forward them simultaneously.
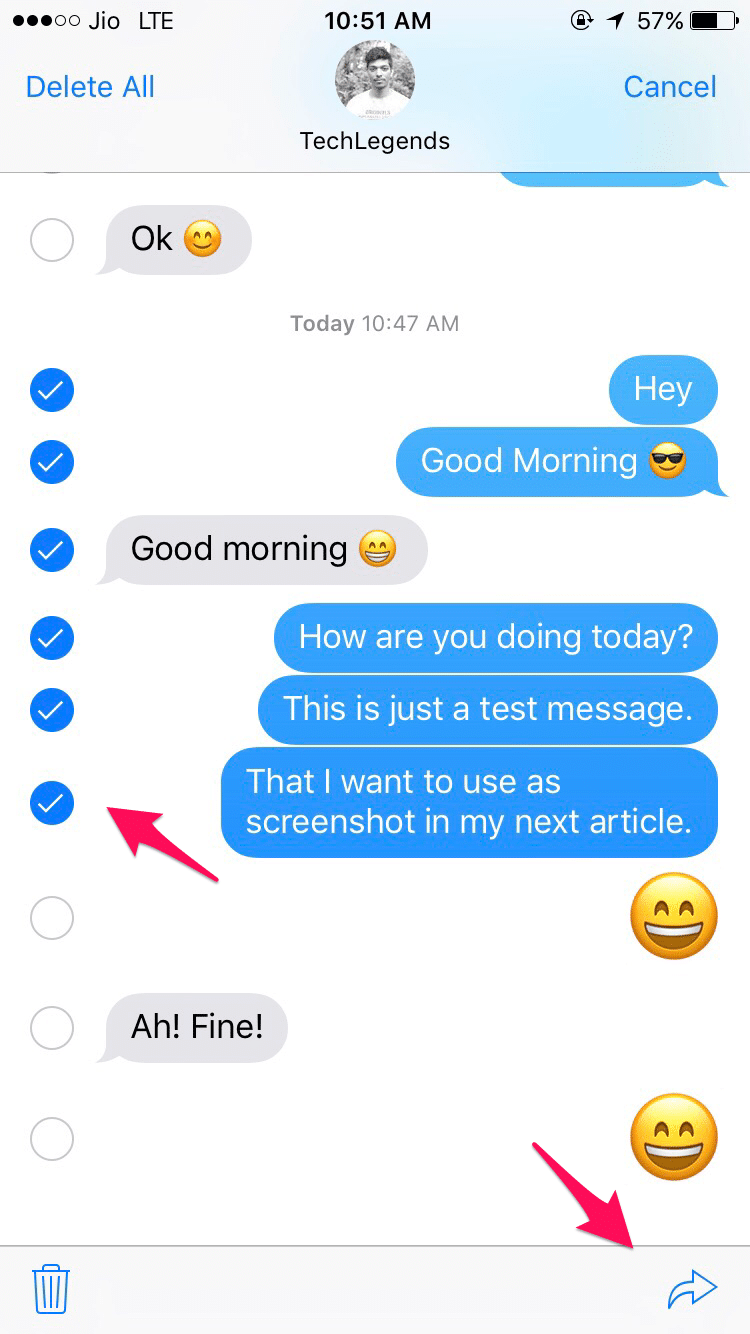
Step 6:
Tap on the Share button that has the form of a curved arrow at the bottom of your display.
Step 7:
You should now see a new text message display with what you want to forward copied into the area where you type the text.
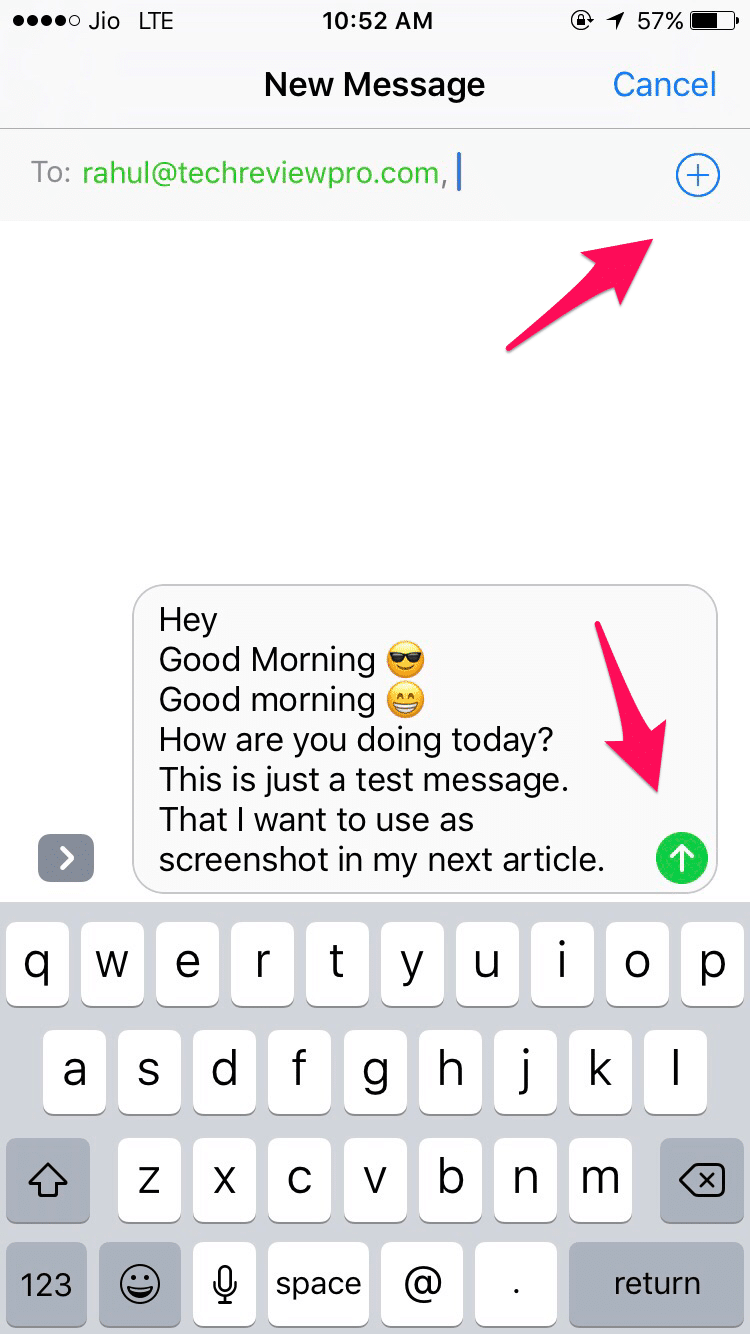
Step 8:
Locate the To: section. This is where you’ll need to insert the name or phone number of where you want your messages to go. You can also tap on the + to look through your contacts, just in case you want to forward them to someone else. Don’t forget to tap Send.
Also Read: TRP Guides: How to Change IP Address in Windows?
How to Auto Forward Text Messages on iOS 6 or Earlier?
If your iOS device has iOS 6 or earlier, the steps on how to forward your text messages are going to vary. The steps may be different, but the good news is that they are still very easy to follow.
Step 1:
Select Messages and go to the text conversation that has the message you need to forward.
Step 2:
Now, choose Edit, and you will see an empty circle beside the messages in the conversation. Select the messages you want to forward. The ones you want to forward should now all have a checkmark.
Step 3:
Tap on Forward and enter the name or phone number of where you want to send the messages you selected. If you tap on the + symbol, you can also look through your contacts as if you are sending a regular message.
Step 4:
Double check that the information you entered is correct. Don’t forget to read slowly because if you read too fast, your information could go to someone else because one letter or number was wrong. Once you sure there are no mistakes, tap on Send, that’s it!
Also Read: How to Download AVG Removal Tool 2017 to Remove All AVG Products From Your PC?
The Pro Review from TechReviewPro
If forwarding calls were something that you could do by just tapping on a button, that would be great. It would save us a lot more time, and you might not even have to install a third-party app. Until Apple and Android make us go through all of the things you currently have to go through, all you can do is wait. Hopefully, they won’t make us wait too long, cross your fingers.
For now, you can try the methods that are mentioned here so you can get your information forwarded. The method you will end up using will depend on what device and iOS you’re using. Still, whether you have iOS or Android, the methods to forward your information is nothing even a beginner in Android can’t do.
Did I miss a method you use to forward your SMS and call info? Let me know what they are in the comments.
Don’t Miss:
- Top 10 Best Android Call Recorder Apps to Record Phone Calls on Android
- How to Restrict YouTube to Permanently Block Adult Videos on YouTube?
- TRP Guides: How to Embed a YouTube Video in PowerPoint Presentation?
- How to Fix YouTube Videos Not Playing on Android, iPhone, Mac, and PC?
- What’s My Subnet? – How to Find Subnet Mask of Your Computer?