Blank rows aren’t bad, but in most sheets, they’re undesirable. Excel uses blanks to determine data ranges, and a blank row in the wrong place will inhibit many built-in features. Fortunately, there’s an easy way to remove blank rows from a data range, but this easy technique has the potential to destroy data, so you must be careful.
Spreadsheets can get messy. Cleaning a sheet of blank rows or columns sounds straightforward enough, but it can be time-consuming if you do it manually. This method gets the job done in just a few clicks, even on massive spreadsheets. First, highlight the area of your spreadsheet where the blank rows are. Include the row just above the first blank row and the row just below the final blank row in your selection.
Also Read: 11 Best Online PDF to Word Converters & Word to PDF Converters
Contents
Delete Blank Rows in Excel – How to Remove Blank Rows in Excel?
First, we’ll show you how to delete blank rows. Deleting blank columns is a similar process that we’ll show you later in this article.
Removing the Blank Rows in Excel
Highlight the area of your spreadsheet in which you want to delete the blank rows. Be sure to include the row just above the first blank row and the row just below the last blank row.
Click “Find & Select” in the “Editing” section of the “Home” tab and select “Go To Special…” on the drop-down menu.
On the “Go To Special” dialog box, select “Blanks” and click “OK.”

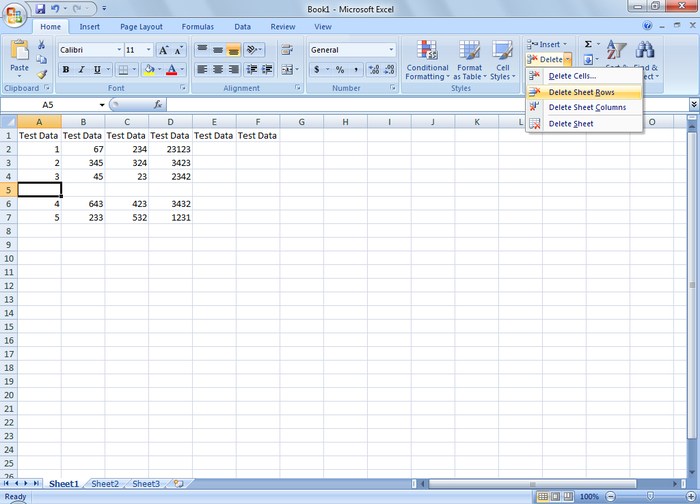
All the cells in the selection that are not blank are de-selected, leaving only the blank cells selected. In the “Cells” section of the “Home” tab, click “Delete” and then select “Delete Sheet Rows” from the drop-down menu.
All the blank rows are removed, and the remaining rows are now contiguous.
You can also delete blank columns using this feature. To do so, select the area containing the blank columns to be removed. Be sure to include the column to the left of the leftmost column to be deleted and the column to the right of the rightmost column to be removed in your selection.
Again, click “Find & Select” in the “Editing” section of the “Home” tab and select “Go To Special…” from the drop-down menu.
Select “Blanks” again on the “Go To Special” dialog box and click “OK.” In the “Cells” section of the “Home” tab, click “Delete” and then select “Delete Sheet Rows” from the drop-down menu. All the blank rows are removed, and the remaining rows are now contiguous.
You can also delete blank columns using this feature. To do so, select the area containing the blank columns to be deleted. Be sure to include the column to the left of the leftmost column to be removed and the column to the right of the rightmost column to be deleted in your selection.
Again, click “Find & Select” in the “Editing” section of the “Home” tab and select “Go To Special…” from the drop-down menu.
Select “Blanks” again on the “Go To Special” dialog box and click “OK.”
Again, all the cells in the selection that are not blank are de-selected, leaving only the blank cells selected. This time, since there are no blank rows selected, only blank columns are selected.
Click “Delete” in the “Cells” section of the “Home” tab and then select “Delete Sheet Columns” from the drop-down menu.
The blank columns to be deleted. Be sure to include the column to the left of the leftmost column to be removed and the column to the right of the rightmost column to be deleted in your selection.
The blank columns are deleted, and the remaining columns are contiguous, just as the rows are.
This method for deleting blank rows and columns is quicker, especially if you have a large workbook containing large and multiple worksheets.
Remove Blank Rows in Excel 2013
If you’re running Excel 2013, navigate to the “Home” tab, then the “Editing” section, and click “Find & Select.” Click “Go To Special…” on the drop-down menu, and select “Blanks.” Click “OK.” Now, only the blank cells should be highlighted. Click the “Home” tab again, navigate to the “Cells” section, and click “Delete Sheet Rows” from the drop-down menu. You can repeat a similar process to remove blank columns from your spreadsheet.
Click “Find & Select” in the “Editing” section of the “Home” tab and select “Go To Special…” on the drop-down menu. On the “Go To Special” dialog box, select “Blanks” and click “OK.”All the cells in the selection that are not blank are de-selected, leaving only the blank cells selected.
Even if you’re not running Excel 2013, a quick Google search for “Find and Select” in your version of Excel will turn up a keyboard shortcut that’ll do the same for you. For example, in Mac Office 2011, the hotkey shortcut is Ctrl+G.
Also Read: Top 14 Best ePub Readers for Windows to Read eBooks on Windows
The Pro Review From TechReviewPro
Choosing Delete Cells deletes only the blank cells in the previously selected range. If you choose Delete Sheet Rows in step 4, you could potentially destroy data (often unseen) to the right. Choose it carefully when using this option to delete blank rows in Excel, when you want to remove just the blank cells. It’s easy to think regarding rows and choose the wrong choice!
Don’t Miss:
- Insert a Checkbox in Word: How to Insert a Checkbox in Word Easily?
- TRP Guides: How to Password Protect Folders and Files in Windows?
- Insert PDF into Word: How to Insert a PDF into Word Document?
- Svchost.exe: What is Svchost.exe and How to Fix Svchost.exe High CPU Usage?
- Electronic Signature in Word: How to Electronically Sign a Word Document?