Anyone can come across a technical issue with his/her browser. One of those issues is the dreaded DNS_PROBE_FINISHED_BAD_CONFIG in Chrome. You probably have no idea what it is or why you got it and how to fix DNS_PROBE_FINISHED_BAD_CONFIG. But, there are various causes for this error, and it can be frustrating trying to figure out the one that is affecting you.
This is an error that is known to not only affect Chrome but other browsers as well. So, Chrome users, it’s not only your favorite browser that gets the DNS_PROBE_FINISHED_BAD_CONFIG error, but Firefox user can also relate to what you’re going through.
Learn: How to Fix ERR_CACHE_MISS in Google Chrome?
Contents
- What Causes The DNS_PROBE_FINISHED_BAD_CONFIG in Chrome?
- How to Fix The DNS_PROBE_FINISHED_BAD_CONFIG By Clearing Chrome’s History
- Reset The DNS and IP
- Try Another DNS Address
- Disable/Enable The Network Connection
- Reboot Your Computer and Router
- Turn Off Windows Firewall Settings
- Disable or uninstall Web Filters
- Use a Good VPN
- Try Another Browser
- Remove DNS_PROBE_FINISHED_BAD_CONFIG from Android
- Update Your Network Drivers
- The Pro Review from TechReviewPro
What Causes The DNS_PROBE_FINISHED_BAD_CONFIG in Chrome?
Just like most of the errors that you will see in Chrome, this error usually appears when you’re trying to access a site. Every time you try to go to a site, Chrome gets the IP address through the DNS. When it can’t do this, you inevitably get this error message and will continue to see it until you fix it.
This problem has also been linked to difficulties with the user’s modem, and it will generally affect every site you’re trying to access. The error message does give you an indication where the problem lies by including the letters DNS.
It has also been linked to problems with your Firewall’s settings, so you will definitely want to take a look at those settings. The first thing you should do if you experience this error is to clear your browser’s history. It’s the easiest solution you can try since data could have somehow become corrupt and is preventing Chrome from working correctly.
How to Fix The DNS_PROBE_FINISHED_BAD_CONFIG By Clearing Chrome’s History
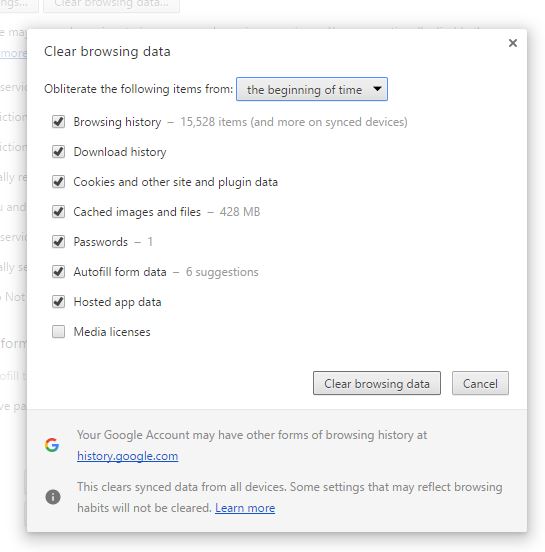
Open Chrome and click on the hamburger icon on the top right. Look for and click on Settings. Select More Tools and then Clear browsing data that will appear in a popup window to your left.
A new window will appear and check the boxes that apply. Click the Clear browsing data button to finish off the job. If you have Chrome open, close it wait a minute and try accessing the site again.
Reset The DNS and IP
To reset the IP and DNS open the Command Prompt the way you usually do. My personal favorite is to right-click on the Windows Start menu and select the Command Prompt option. Once the command prompt is open type in the commands:
netsh int ip reset
netsh winsock reset
ipconfig /flushdns
ipconfig /renew
Press Enter, and it will do the rest. Check to see if you still see the error message. If you still see the error try rebooting Chrome or your computer for that matter.
Try Another DNS Address
This method may sound a little complicated to some, but it’s not. Even if you’re a beginner, it’s something you can quickly do by right-clicking on the WiFi icon in your computer’s taskbar. Unless you’ve moved it, you will find it on the bottom right. Choose Open Network and Sharing Center.
To the left, you’ll see the Change adapter settings, click on it and then click on the connection that has the problem (WiFi, LAN, Ethernet, etc.). Now, click on Properties and when the window opens choose Internet Protocol Version (TCP/IPv4) and click on Properties. Towards the bottom, you should see the option that says Use the following DNS server address. The first box will be Preferred DNS Server. All the numbers in that box should be all eights with a dot separating them.

Right below it will be the Alternate DNS Server box. There, the first two numbers will be eights, and the last two will be fours. Make sure that you also check the option at the bottom left that says Validate Setting Upon Exit and click OK. Check to see if you still have the same problem. If the error is still there try Preferred DNS server 205.67.222.222 and the Alternate DNS server should be 205.67.220.220.
If the error is still there try Preferred DNS server 205.67.222.222 and the Alternate DNS server should be 205.67.220.220. Be extra careful and double-check that you have entered the numbers correctly by double-checking.
If you’re on Mac, the steps are a little different but it’s still easy to access. Click on Menu and then choose System Preferences. Click on Network and enter your password if you have to. Choose the Network connection you want to change.
To modify the Google Public DNS setting on Ethernet select Built-In Ethernet and choose Advanced. If you want to modify the wireless network settings click on Airport and then Advanced.
To replace the addresses that are already there click on the plus sign. Adding a new Google IP address to the list is easy; type all eights with a dot in between each and then two eights and two fours with their dots as well.
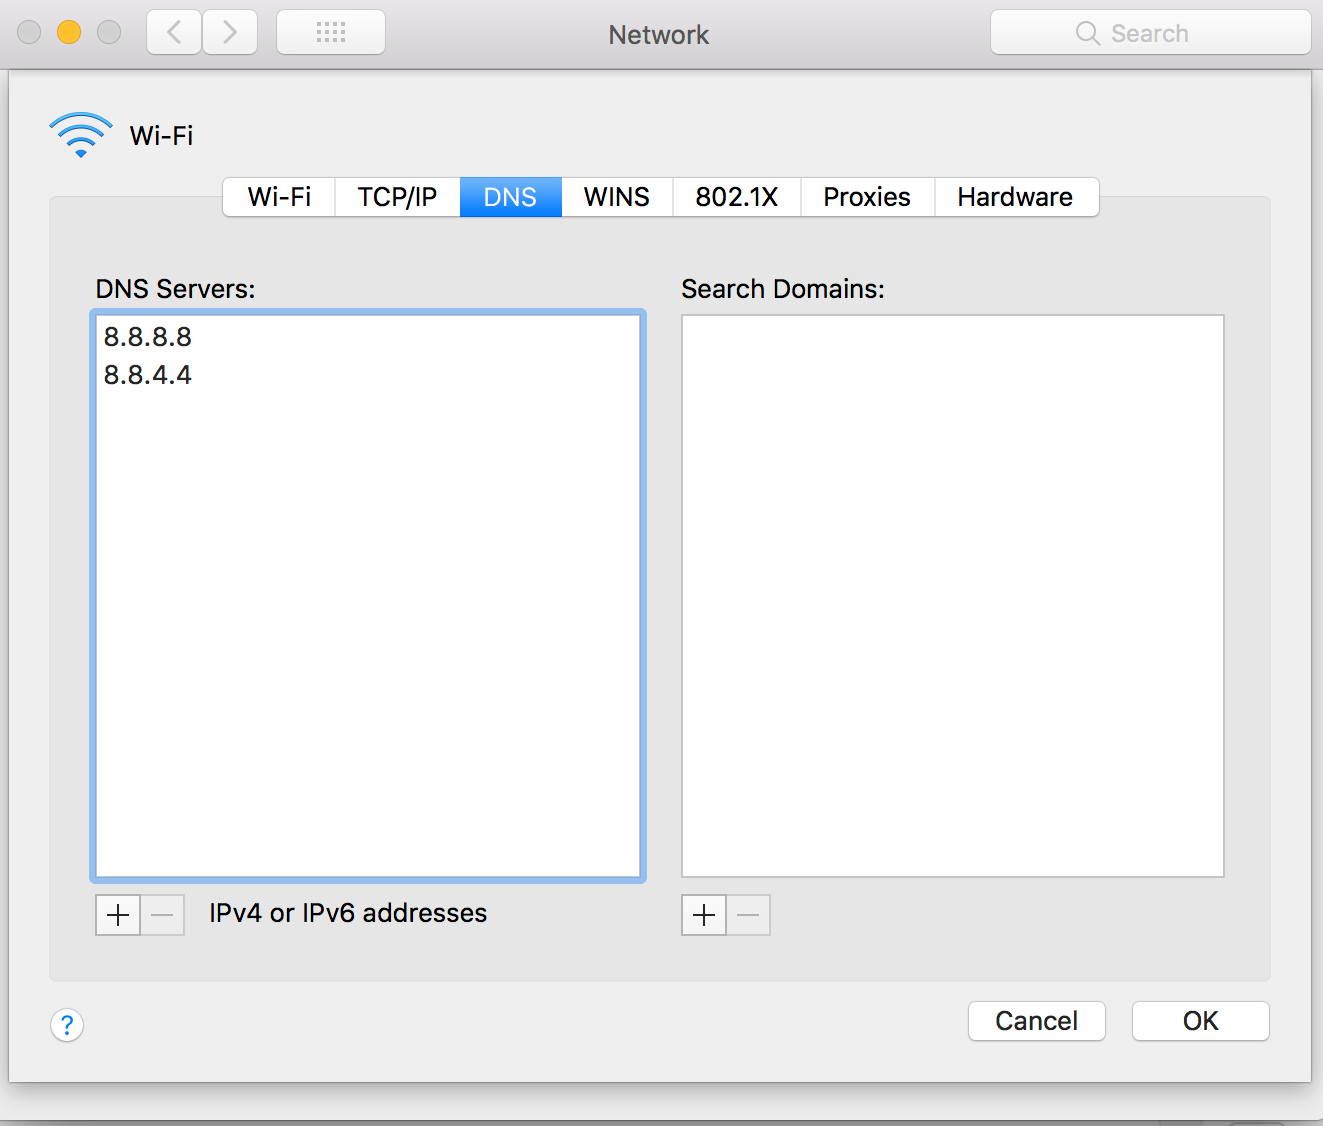
You’ll be entering the same numbers as Windows users. Don’t forget to click on Apply and OK.
Disable/Enable The Network Connection
To turn off the Network Connection press the Windows Key and type CMD. Right-click on it and select Run as administrator. Type netsh int ip reset and press Enter. You will need to reboot your computer. Once your computer is back on, go to Control Panel and then to Network and Sharing Center. Or, if you prefer, you can also right-click on the network icon in your computer’s taskbar and select the same option.
To the left, you’ll see the Change adapter settings. Now, right-click on the active network connection and turn it off. Right-click one more time but this time choose Enable. Get back to your home WiFi and launch Chrome to see if you’re still getting that problem.
Reboot Your Computer and Router
If you see that this method keeps appearing here and there, it’s for a reason. A simple reboot of the hardware can sometimes work wonders. Turn off your router and leave it off for a few minutes. When the time is up, turn it back on, and you should be problem-free.
Turn Off Windows Firewall Settings
Drastic times call for drastic measures. You probably wouldn’t turn off your Windows Firewall just to see if it would fix the issues but if you’ve tried all of the above steps and you still see it, try it.
Click on the Windows Start menu and click on the Control Panel option. Find Windows Firewall and under private and public network settings click on Turn off Windows Firewall (not recommended).
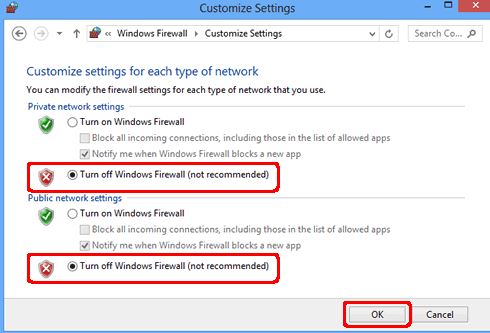
Click on OK at the bottom right, and the Windows firewall should now be off. You know the drill: see if the issue is still there.
Disable or uninstall Web Filters
It’s not uncommon for parents to use certain parental control Softwares that block sites or filters them out. There are things that kids shouldn’t see and these software’s help. The problems with those Softwares is that they can cause Chrome to experience problems.
If you notice that you started getting this error message right after you installed one or made some changes to it, you may want to undo those changes. If that doesn’t work, you can also try disabling it.
Use a Good VPN
There have been cases where external Firewalls such as Australia’s and China’s have caused problems with how Chrome works. If you think that this is your case then getting yourself a good VPN just might do the trick.
A word of caution. If it’s possible, try to get a paid VPN. The free ones work great, but the problem with them is that they share your information with who knows. That’s the price you get for using a free VPN. If privacy is a real issue for you, then go for the paid version.
Try Another Browser
You could also try another browser to see if the problem is only in Chrome or not. You could try using Firefox and see if you get an error message when trying to access the same site. If you can see it, then it looks like it’s a Chrome-only problem.
Your best option for a Chrome-only problem would be to uninstall the browser. It’s up to you if you want it back or not but the installation process is mind-numbingly easy. Click on the Windows Start Menu and click on Control Panel.
Look for Programs and then for Programs and Characteristics (features). Now, look for Chrome and click on it. Just click Uninstall and wait for the process to finish. Once Chrome has been uninstalled go to Chrome’s official site to download it again.
Remove DNS_PROBE_FINISHED_BAD_CONFIG from Android
This problem can also appear if you’re on your Android device. To troubleshoot the problem on your Android device go to Settings and then to WiFi. Long-press on your network and tap on Modify network.
Tap on Show advanced options and under IP settings you’ll see a drop-down menu. Then tap on it and choose Static and type in the IP addresses to DNS 1 and 2. Tap on save so you won’t lose your changes. Now, connect to your network so the new settings can be activated.
Update Your Network Drivers
It’s not uncommon for out of date drivers to cause problems. If you can’t even remember the last time you updated them, then it’s time to do that. Which drivers you install is obviously going to depend on the manufacturer that you are using. Go to the official website and look for the latest drivers and install them. Hopefully, this will be the key to fixing this annoying problem.
Also Read: How to Fix ERR_NAME_RESOLUTION_FAILED Error?
The Pro Review from TechReviewPro
Google Chrome can show you all type of errors. Good thing that there are methods that you can use for every one of those errors. You just need to have a good cup of coffee and a lot of free time since you don’t know how long finding the right method is going to take.
If you have any questions feel free to leave a comment. Or, if you’ve found a method that has worked for you and is not listed here, share it with us so others can benefit from it as well. Which method worked for you?


Comments on this entry are closed.
really helpful article for us.
Glad I could help. 🙂